Suspension Upgrade: Fitting Coilovers to your Mazda MX5


MX5’s balance and drivability have had their share of praises, so there are many people who have decided to upgrade what Mazda seems to be missing on purpose. No, it’s not suspension, but power rating. Having in mind the horsepower under the hood of the MX5, the suspension parts are more than adequate and they provide a perfect mix of comfort and performance, making the MX5 the world’s best sold roadster.
However, there are many people who choose to upgrade the power, usually by adding a turbocharger, which can make the car significantly more powerful. Moreover, having in mind the lightweight body and amazing balance, any kind of an increase is noticeable.
Still, if you opt for adding a turbo, some other parts might become lacking, including brakes and suspension. If you wish to upgrade your ride’s handling, getting coilovers will make dramatic changes.
Why coilovers?
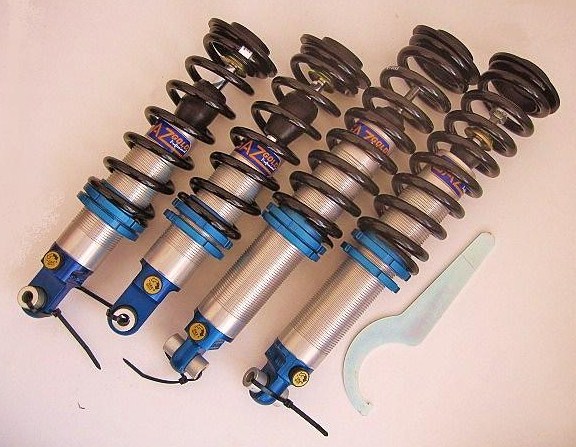
Let’s make one thing clear. Coilovers are not the most advanced widely used option. It’s the air suspension, but for now, it is used on high profile cars and it costs an arm and a leg.
Opting for higher performing shocks and springs is by far the cheapest option that will bring some kind of an improvement, but coilovers bring the best of both worlds. They are a bit more expensive than good springs and shocks, but they are immensely better. On the other hand, for most sporty drivers, they might actually be pretty close to the air suspension offerings in terms of cornering performance, while actually not costing as much as a small island in the Caribbean, not to mention the maintenance costs.
Coliovers are basically a coil spring and shock in one and, depending on a particular product, they can even provide height adjustability. If you are upgrading your car with aftermarket shocks and springs, you will have fewer options and you need to make sure the two parts match. With coilovers, you just need to bolt them on.
There are several different kinds of coilovers with varying functionality and price, but installation process on an MX5 is pretty much the same.
Installing coilovers on your MX5
Notice: while removing parts, you should make sure that you do not lose any of them and that you remember the exact order they were in, so that you can reassemble everything the way it should be.
The first thing you need to do is remove the front wheels. This will give you access to the bolt that holds a brake line bracket. It is placed on the strut body and removing it will enable you to move the strut later.
The next step is disconnecting the sway bar from the link. In all honesty, this is not obligatory, but it makes the entire ordeal significantly easier and safer and it is very easy to do. It’s a matter of removing a bolt and a nut and that’s it. So, do it!
After this you should disconnect the shock from the lower control arm. This is done by removing the nut and bolt that are placed right behind the disc brake.
The strut is a pretty sizeable part, so you will need some room to remove it without getting tangled up, or even damaging something. This is why you should detach the upper control arm. To access this, you should remove the plastic trim that covers a part of your MX5’s engine. MAKE SURE you remove ALL bolts holding the trim. You will find two of them in each wheel well and more on the underside.
After the trim has been removed, you will be able to access the bolt and nut that keep the upper control arm connected. This bolt is very long.
When the upper control arm has been disconnected, you can get under the hood. There you need to find the strut tower and remove the two nuts which hold the strut in place by connecting the top of it to the strut tower. Once they are removed, the strut will be completely disconnected and very easy to remove.
Connect the strut to a spring compressor and remove the nut that holds the top mount to the strut. You need to install the top mount to the coilover. Make sure all of the parts are in the correct position and in order (here we mainly have in mind the top hat and plastic collar that stand between the spring and the top mount, but depending on the type of your coilover, there might be more parts).
Tighten the mount to the coilover. Make sure it is tightened completely and firmly in place. After this has been done, put the coilover in the wheel well and push the top mount studs through the holes in the tower. Reinstall and tighten the two nuts that you have previously removed accessing them from under the hood.
Once the top has been secured, you can reinstall everything else in the reversed order. First connect the upper control arm and reinstall the long bolt and secure it using the nut. Make sure all of the washers are in the original position and order (usually two of them, a bigger one that goes first and a smaller one after it. The nut goes last, of course).
Do the same for the lower control arm, attach the sway bar to the link, then the brake line bracket, the plastic trim (make sure you install all of the bolts, this time starting with the ones from the underside) and the wheel.
For the rear wheels, the process is fairly similar, with some minor differences. After you remove the wheels, you should detach the sway bar and then remove the bolt that holds the strut and the control arm together.
The top mounting for the rear is placed under the carpet in the boot. Once you remove this, you will be able to access the metal cover that stands there to protect the petrol line. Once you remove the cover, you will be able to access the rear shock tower and remove the two nuts just like you did at the front. The petrol lines might make the access a bit trickier, so you might need an extension.
After the nuts have been removed, you should pull the hub down and remove the shock. Repeat the process of removing the mount and installing it on the coilover (tighten it completely and mind the order of the parts again).
Insert the coilover in its position, tighten the nuts that hold the mount to the tower and put back the protective metal cover and carpet. After this, tighten the bolt that connects the hub and the lower part of the shock, attach the sway bar and install the rear wheel.
Final note: you do know what a heavy-duty role the coilover has, so you always make sure that all of the bolts and nuts have been tightened completely.